I recently was working on a super secret project, and found I needed a pretty background fill that enhanced the overall design. I wanted something that looked like a budding flower, or opening petals, something organic, easy and consistent since the other details were more like thread painting and I wanted a nice contrast. Based off designs from the Art Nouveau and Art Deco periods, which I happen to like a lot, this fill was the perfect solution, hope you enjoy the tutorial!

Sorry, this is as much as I can show you!
While I did this design on my longarm, this is a background fill you can use with a domestic machine, as well.
This does require marking, and I first chalked a grid, and then chalked deep bell-shaped curves.

I marked the grid, and then spent some time getting the first row of bell curves started. The first few are the hardest.
The first few are the trickiest to get set up correctly. Once the first row is more or less correct, then I work my way down the next row, trying to get the swoops to be more or less the mirror opposite. You can see where these need some more adjusting.
 They look like Christmas ornaments to me, when they’re all sketched in. This shape is going to be the guide for your fill. You won’t actually stitch this spine. This is horizontal, but you could easily mark it vertically, as well.

An exaggerated S-curve
The first curve is an exaggerated S-shape. You want the tip to come to the line and stretch up a bit, because you’re going to echo it back to just touch the belly of the first.

You can see the first pass in green and the second pass in purple; while the beginning S-curve in purple is good, the echo needs some work.
Repeat a second time. This pass helps to start giving shape to your design.
 The third pass is in red, and there are a few things I want to point out. Each of the points is filling up the center, and each of the bellies is creating the outer curve. I backtrack to just touch the line before it. The fourth pass, though, is where I will create that outer bell-shape, and it is probably the most important of all of them.
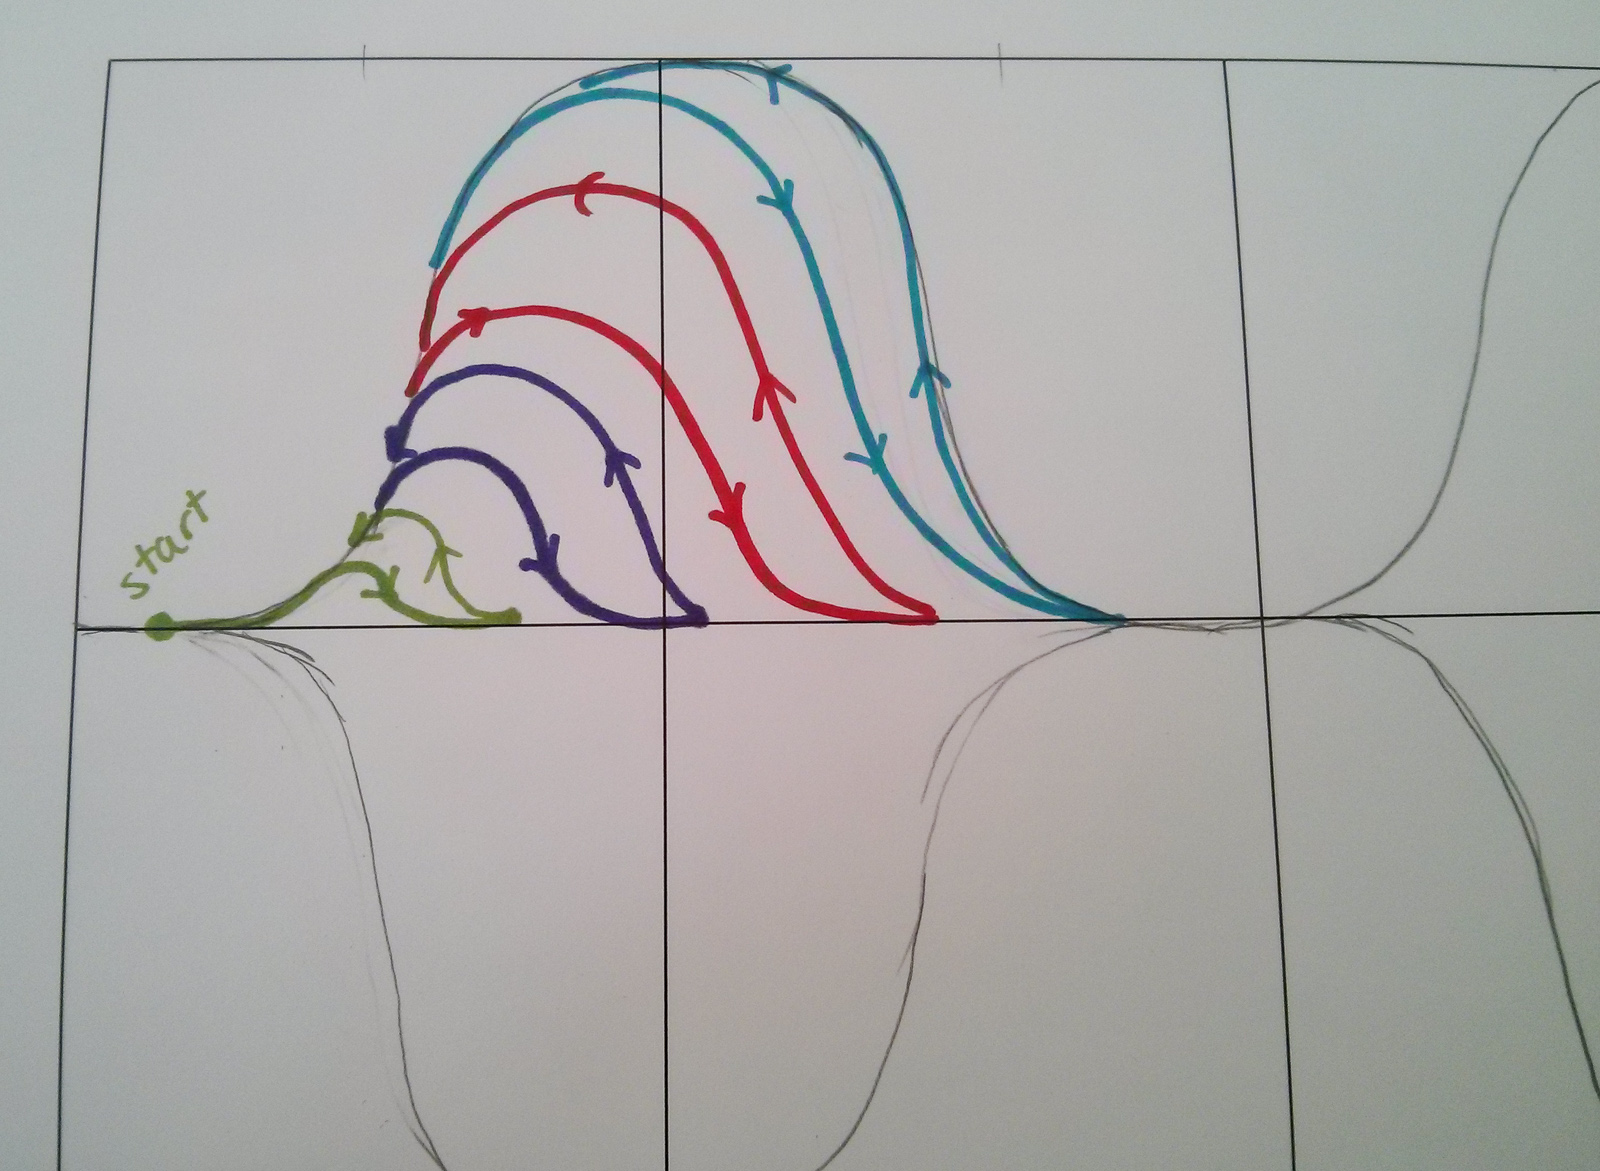
The fourth pass is in blue.
Begining the fourth pass, you want to create a beautfully shaped curve. The interior shapes aren’t as big a deal as this one, since it is creating the first half of the spine for your next bunch of petals. I used my chalked line to help me with that shape, and while I try to get it as close as possible, I am ok with it being “close enough”. It is, after all, supposed to be an organic natural form.
It’s time to start the beginning of my next shape. I will pick up where that last blue line left off, and create an S shape using the previously stitched line as my spine:

This will use the exact same shapes as before, just on the other side. You won’t need to backtrack as far on the next few S shapes, because your spine is already complete thanks to final pass on the previous shape.
Definitely draw this a couple of times. I had a hard time envisioning how the S curves alternated when I was working this out, and some of them were a bit odd-looking.
In this photo, the first row is in different colors so you can see how I formed each of the shapes. The second and third rows, both starting at the left, are in black so you can see the whole design.

- The first shape is in green, and you can see that I had to pay attention to that first set of swoops, backtracking to touch, so that I would get that nice bell-shaped curve. The next chunk of leaves, in blue, you can see that I simply had to touch back to that last green curve for the first few S shapes.
- Note that the last point of the green and the last “backswoop” of the blue touch, and finish of the top of the bell. You can really see this where the red and orange meet, I think.
I drew this pretty quickly, but I think you can get the idea from the quilting above that this really is a nice fill for making your background have movement and life. It can be quilted really big or really small. Happy quilting, and I’d love to see samples if you choose to use this! Happy quilting!
Here’s a practice sheet for the background fill. Print out however many you want! This one has black lines OnionBackgroundFill
and this one has lighter grey lines OnionBackgroundFillGrey
ETA: I also shared these swirly variations. Enjoy!


this is a gorgeous design. Thank you for sharing this!
My pleasure!
Wow May be just what I was looking for for this space in my spinner quilt…thanks for sharing!
Thank you, and I’m glad you enjoyed it!
lovely design and a very good tutorial. Thank you for sharing.
Amazing, thank you for the tutorial
Glad you liked it!
Very cool. At some point, I’ll get to try that idea myself. Enjoy the snow day.
I like it….I love it, and that’s all I’m gonna say. It is a wonderful fill. Great work Mandy!!!
Thank you for your generosity. I like the texture this creates, and I enjoyed the tut, also I printed the page and hope to try it out sometime. I’m still in my practice, practice, practice mode…. thanks for the inspiration!
Wow that is very neat! Thanks for sharing
Thank you for the great design and showing it step by step using the different colors. I will have to practice this as is a cool design.
Patty
It is lovely!
Thanks everyone! I’d love to see if you use it, sometime. Happy quilting!
Thank you so much for the tutorial. I had a project and did not have a clue what to fill it with until I saw your design. I just completed it and it looked great! Thank you once again. SawPeng
Yay! On my fifth attempt I managed to draw something slightly resembling this.
Good for you; the drawing is key, Jane! It trains your brain to see the designs before you actually get to the machine, which is a tremendous help when you’re doing it for reals.
Thanks Ben. Yes, I’ve been told by everyone to draw, so have been doing it consistently since I discovered a long arm rental not too far away. I tried free motion on my Singer and didn’t really enjoy it. I have enough problems home quilting baby quilts with straight lines. I imagine it might take a year or so for me to confident doing my own quilts, but the machine owner has heaps of charity quilts to practice on.
lovely and easy tutorial. I am very happy that you shared it with us. thankful greetings from austria
Gorgeous! Thank you for sharing such a detailed and clear tutorial!
I’m also glad you postied it on the MQG forum.
Wow! Pretty! Thank you